Document updated on Mar 29, 2020
JWT Signing
The JWT signing component creates a wrapper for your login endpoint that signs with your secret key the selected fields of the backend payload right before returning the content to the end-user.
The primary usage for this component is in migrations from monolith to microservices, or in ecosystems where there is no Identity server yet, as it allows the immediate adoption of signed JSON Web Tokens without the need to implement a new service.
The JOSE component is responsible for signing tokens.
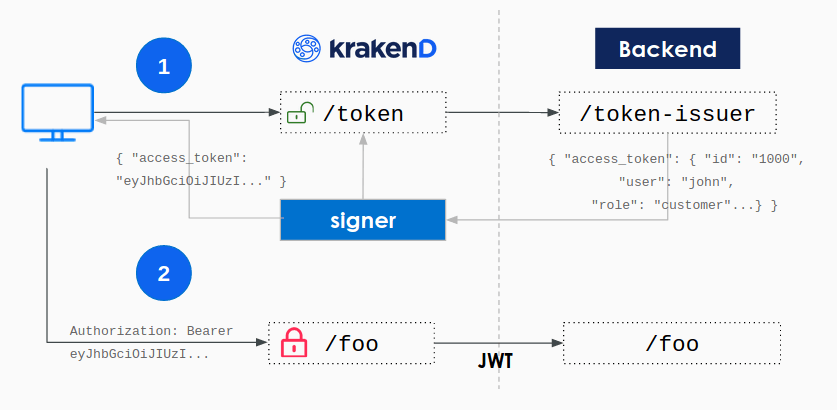
How does it work
Your backend needs to implement an endpoint to issues tokens, and optionally another endpoint for refreshing tokens. If you don’t have them yet, you need to adapt the existing functionality to support them, but don’t be overwhelmed; you only need to return a payload with JSON content after the login instead of setting the cookie session.
When KrakenD receives the JSON payload, it signs the selected group of claims with your secret key. The secret key can be kept in the gateway or URL-downloaded from a trusted machine that you own. With the token signing, you are in control of the private key, and you don’t need to trust an external service to keep it for you.
For instance, your backend could have an endpoint like /token-issuer that when receives the right combination of username and password via POST can identify the user and, instead of setting the session, returns an output like this:
curl -X POST --data '{"user":"john","pass":"doe"}' https://your-backend/token-issuer
{
    "access_token": {
        "aud": "https://your.krakend.io",
        "iss": "https://your-backend",
        "sub": "1234567890qwertyuio",
        "jti": "mnb23vcsrt756yuiomnbvcx98ertyuiop",
        "roles": ["role_a", "role_b"],
        "exp": 1735689600
    },
    "refresh_token": {
        "aud": "https://your.krakend.io",
        "iss": "https://your-backend",
        "sub": "1234567890qwertyuio",
        "jti": "mnb23vcsrt756yuiomn12876bvcx98ertyuiop",
        "exp": 1735689600
    },
    "exp": 1735689600
}
Besides these example keys, the payload can contain any other elements you might need.
If you come from a classic login system, based on cookie sessions, you’ll realize that adapting your /login to this output is straightforward. See how to generate a token at the end of the document for more details.
Basic JWT signing
Your backend application knows how to issue tokens now, so the gateway can sign them before passing to the user. To achieve that, instead of publishing our internal backend that generates plain tokens under /token-issuer, we only expose via KrakenD a new endpoint named /token (choose your name). This endpoint forwards the data received in the POST (as selected in the example) and returns a signed token when the backend replies.
For instance, from the plain token above we want to sign the keys "access_token" and "refresh_token" so nobody can modify its contents. We need a configuration like this:
"endpoint": "/token",
"method": "POST",
"backend": [
{
    "host": [ "https://backend" ],
    "url_pattern": "/token-issuer"
}
],
"extra_config": {
    "github.com/devopsfaith/krakend-jose/signer": {
        "alg": "HS256",
        "kid": "sim2",
        "keys-to-sign": ["access_token", "refresh_token"],
        "jwk-url": "http://your-backend/jwk/symmetric.json",
        "disable_jwk_security": true
    }
}
...
Notice that a JSON Web key jwk-url is provided to sign the content. Generate your key and save it in a secure place.
disable_jwk_security flag because the jwk-url references an URL with an insecure protocol HTTP. When going to production serve your JWK under HTTPS instead and add the rest of security options in the configuration.What happens here is that the user requests a /token to the gateway and the issuing is delegated to the backend. The response of the backend with the plain token is signed using your private JWK. And then the user receives the signed token, e.g:
{
"access_token": "eyJhbGciOiJIUzI1NiIsImtpZCI6InNcdTIifQ.eyJhdWQiOiJodHRwOi8vYXBpLmV4YW1wbGUuY29tIiwiZXhwIjoxNzM1Njg5NjAwLCJpf1MiOiJodHRwczovL2tyYWtlbmQuaW8iLCJqdGkiOiJtbmIyM3Zjf1J0NzU2eXVcd21uYnZjeDk4ZXJ0eXVcd3AiLCJyb2xlcyI6WyJyb2xlX2EiLCJyb2xlX2IiXSwif1ViIjoiMTIzNDU2Nzg5MHF3ZXJ0eXVcdyJ9.htgbhantGcv6zrN1i43Rl58q1sokh3lzuFgzfenI0Rk",
"exp": 1735689600,
"refresh_token": "eyJhbGciOiJIUzI1NiIsImtpZCI6InNcdTIifQ.eyJhdWQiOiJodHRwOi8vYXBpLmV4YW1wbGUuY29tIiwiZXhwIjoxNzM1Njg5NjAwLCJpf1MiOiJodHRwczovL2tyYWtlbmQuaW8iLCJqdGkiOiJtbmIyM3Zjf1J0NzU2eXVcd21uMTI4NzZidmN4OThlcnR5dWlvcCIsInN1YiI6IjEyMzQ1Njc4OTBxd2VydHl1aW8ifQ.4v36tuYHe4E9gCVO-_asuXfzSzoJdoR0NJfVQdVKidw"
}
JWT signing settings
The following settings are available to sign JWT:
alg: recognized string. The hashing algorithm used by the issuer. UsuallyRS256.jwk-url: string. The URL to the JWK endpoint with the private keys used to sign the token.kid: string. The key ID purpose is to match a specific key, as the jwk-url might contain several keys (see JWT validation)keys-to-sign: string list. List of all the specific keys that need signing (e.g.,refresh_tokenandaccess_token).
Optional fields:
full: boolean. Use JSON format instead of the compact form JWT is giving.disable_jwk_security: boolean. Whentrue, disables security of the JWK client and allows insecure connections (plain HTTP) to download the keys. Not recommended for production.
Security enforcement:
jwk_fingerprints: string list. A list of fingerprints (the unique identifier of the certificate) for certificate pinning and avoid man in the middle attacks. Add fingerprints inbase64format.cipher_suites: integers list. Override the default cipher suites. Unless you have a legacy JWK, you don’t need to add this value.jwk_local_ca: string. Path to the certificate of the CA that verifies a secure connection when downloading the JWK. Use when not recognized by the system (e.g., self-signed certificates).
The following example contains every single option available:
"endpoints": [
    {
      "endpoint": "/token",
      "method": "POST",
      "extra_config": {
        "github.com/devopsfaith/krakend-jose/signer": {
          "alg": "HS256",
          "jwk-url": "http://your-backend/jwk/symmetric.json",
          "keys-to-sign": [
            "access_token",
            "refresh_token"
          ],
          "kid": "sim2",
          "cipher_suites": [
            5,
            10
          ],
          "jwk_fingerprints": [
            "S3Jha2VuRCBpcyB0aGUgYmVzdCBnYXRld2F5LCBhbmQgeW91IGtub3cgaXQ=="
          ],
          "full": true,
          "disable_jwk_security": true
        }
      }
    }
  ]
How to generate a JWT token
Essentially, what you need to adopt JWT in your backend is to adapt your existing /login function (maybe passing an additional ?token=true flag), so when a user logs in, instead of setting the session in a cookie, you return the JSON Web Token for KrakenD to sign.
The token is no more than a JSON output adhering to the JWT standard.
There are a lot of open source libraries to generate JWT tokens in all major languages. Use them or write the JSON output directly with a simple template.
Here is a dummy token for you to check how it looks like.
Live running example
The KrakenD Playground demonstrates how to sign tokens in the /token endpoint and includes an example ready to use. To try it, clone the playground and follow the README.
