Enterprise Documentation
Global rate limit (stateful)
Document updated on Nov 3, 2020
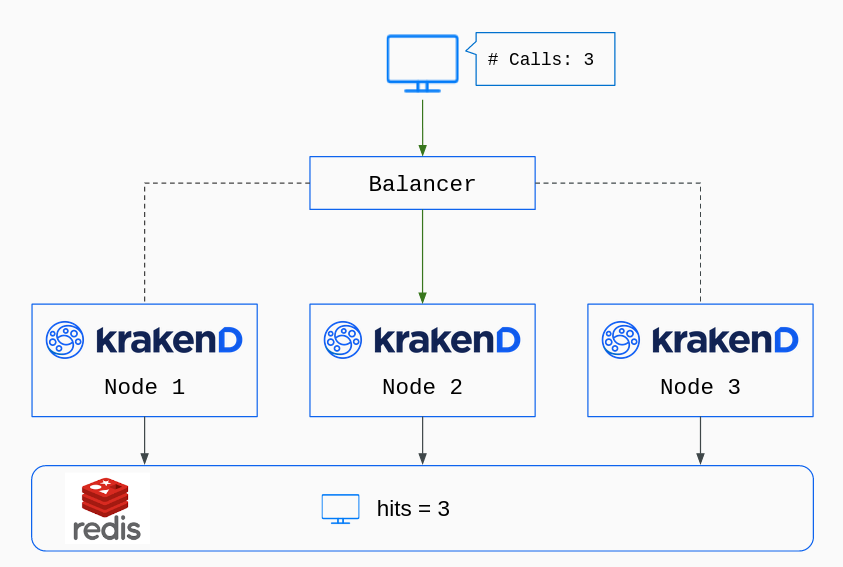
The global rate limit functionality enables a Redis database store to centralize all KrakenD node counters. Instead of having each KrakenD node count its hits, the counters are global and stored in the database.

Default rate limit (stateless) vs. Global rate limit (stateful)
It’s essential to understand the differences between these two antagonistic approaches, so let’s put an example.
Let’s say you have four different KrakenD nodes running in a cluster, and you want to limit a specific set of users to 100 requests per second.
With the default rate limit, every KrakenD node only knows about itself. Whatever is happening in the rest of the nodes is not visible to itself. Since you have four KrakenD boxes, you need to write in the configuration a limit of 25 reqs/s. When all nodes are running simultaneously and balanced equally, you get the average limit of 100 reqs/s. When the system is running to almost full capacity of the configured limit, users can see rejections as some of the nodes will have reached their limit already while others still have capacity. If you ever deploy a 5th machine with the same configuration, your total rate-limit upgrades to 125 reqs/s. You are adding 25reqs/s more capacity with the new node. But if you remove one of the four nodes, your total rate limit would be 75 reqs/s.
The global rate limit, on the other hand, makes the nodes aware of what is happening with their neighbors. Awareness comes from the fact that all KrakenD nodes read and write the counters on the central database (Redis), knowing the real number of hits on the whole platform. If you add or remove nodes on the fly, the limits are invariable.
From a business perspective, the Global rate limit might sound more attractive. In contrast, from the technical point of view, the default rate limit is much better as it offers infinite scalability and much higher throughput.
Our recommendation (an engineer writing) is always to use the default rate limit.
Configuration
To enable the global rate limit on KrakenD EE, the redis-ratelimit.so has to be available in the plugins folder. The rate limit is enabled as follows:
{
    "version": 2,
    "plugin": {
        "pattern":".so",
        "folder": "/opt/krakend/plugins/"
    },
    "endpoints": [{
      "endpoint": "/foo",
      ...
      "extra_config": {
          "github_com/devopsfaith/krakend/transport/http/server/handler": {
            "name": ["redis-ratelimit", "some-other-plugin-here" ],
            "redis-ratelimit": {
                "Host": "redis-url",
                "Tokenizer": "ip",
                "Burst": 10,
                "Rate": 100,
                "Period": "60s"
            }
        }
      }
    }]
}Note: The key "some-other-plugin-here" above demonstrates how to load more than one router plugins.
The configuration options are described below:
Host: The URL to the Redis instance that stores the counters.Tokenizer: The strategy to rate-limit users. What is for you a “user”? Valid values are:jwt: When the user is authorized using JWT token tokens, thejtiis used as a unique identifier.ip: Every different IP is considered a new userurl: The whole requested URL is hashed as the identifierpath: Rate-limit users by the requested pathheader: A custom header identifies the uniqueness of the userparam: A parameter in the request contains the identifier on which to limitcookie: Cookie content defines the user.
TokenizerField(optional): The field used to set a custom field for the tokenizer (e.g., extracting the token from a custom header other than Authorization or using a claim from a JWT other than the jti)Burst: How many requests a client can make above the rate specified during a peak.Rate: Number of allowed requests during the observed period.Period: Time window on which the counters take effect, with units (s,m,h), E.g., use120sor2mfor two minutes.