Document updated on May 2, 2021
Keycloak Authorization
The Keycloak integration allows one of the many possible OpenID Connect different security options available in KrakenD.
Keycloak is an Open Source Identity and Access Management project, sponsored by RedHat. The KrakenD configuration for Keycloak relies internally on the JWT validation component.
Keycloak integration
JSON web tokens (JWT) are an open standard (RFC 7519) that define a way for securely transmitting information between parties. JWT tokens are compact, secure (digitally signed), and have become an industry-standard used at internet scale. KrakenD supports any system using this open standard, including Keycloak.
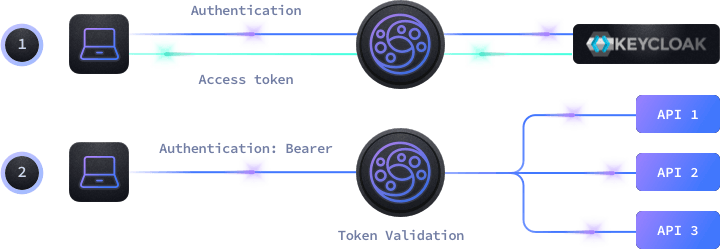
Either if you are trying to protect your API from end-users or machine-to-machine access, the workflow is the same:

- End-Users use their applications to log in to Keycloak who provides an access token for the session.
- Machine-to-machine communication also uses a token from Keycloak after providing a client_id and a client_secret.
- With the token generated by Keycloak, the client passes it to KrakenD in each request inside an HTTP header or cookie
- KrakenD authorizes or not the usage of the specific endpoint according to the rules you have configured.
As KrakenD can validate the Keycloak signature by itself, it does not need to call the Keycloak server to validate the token every time. Instead, KrakenD queries Keycloak every 15 minutes (configurable) to ensure the key has not rotated.
Protecting endpoints with Keycloak tokens
We will create a simple KrakenD configuration with a single endpoint /keycloak-protected. This endpoint enables JWT validation and makes sure that no user or machine can access the resource without passing a valid token.
Paste the following configuration into a krakend.json file.
{
  "version": 3,
  "timeout": "3s",
  "endpoints":[
  {
    "endpoint": "/keycloak-protected",
    "extra_config": {
        "auth/validator": {
            "alg": "RS256",
            "jwk_url": "http://KEYCLOAK:8080/realms/master/protocol/openid-connect/certs",
            "disable_jwk_security": true
        }
    },
    "backend": [
        {
          "host":["http://localhost:8080"],
          "url_pattern": "/__health"
        }
    ]
  }]
}
From the configuration above, you have to replace the KEYCLOAK:8080 value to match your installation. If you don’t use the default realm master then change it also in the jwk_url.
Make sure that the JWK URL exists, some set ups do not have the /auth/ part in the URL.
That’s the minimum configuration you need to protect your API from being accessed by someone who has not a valid token from Keycloak. Also notice there is a flag "disable_jwk_security": true, this is necessary when we are accessing our JWK address with http instead of https.
Now you might want to add additional checks to your system and take advantage of all the powerful features of Keycloak. This is possible by declaring more elements into the configuration.
Keycloak demo with KrakenD
The repository “Demo Microservices with keycloak and krakend” by Ben Siewert, is a demonstration project integrating microservices with Keycloak for authentication and KrakenD as an API gateway.
It consists in two Node microservices fronted and protected by KrakenD. The identities and tokens are taken from Keycloak and KrakenD validates the token to accept or deny access to the services behind.
