Document updated on May 2, 2021
Auth0 Integration
Let’s start with the elephant in the room: when you face the challenge of creating a modern API that has to be scalable, secure, performant, and resilient, it might look like a daunting task.
The good news is that combining products like Auth0 and KrakenD helps you solve this exact problem with an implementation that is straightforward.
Auth0 can authenticate users and machines, and KrakenD knows your business APIs and validate them in a very efficient and convenient way. Both products work in perfect symbiosis to secure your APIs.
The Auth0 - KrakenD integration
JSON web tokens (JWT) are an open standard (RFC 7519) that define a way for securely transmitting information between parties. JWT tokens are compact, secure (digitally signed), and have become an industry-standard used at internet scale. KrakenD supports any system using this open standard, and Auth0 has been its preferred SaaS integration.
KrakenD offers integration with Auth0 at three different levels:
- End-users validation for those using an app of any kind (3-legged auth), and then users provide a token inside a header or cookie.
- Machine-to-gateway communication. Machine-to-machine, APIs talking to APIs, automated systems, and other uses of non-human communication. Machines have a client id and secret that allows them to request a JWT token to access protected resources.
- Gateway-to-machine communication, for those cases where the gateway also needs to access protected backends requiring client credentials.
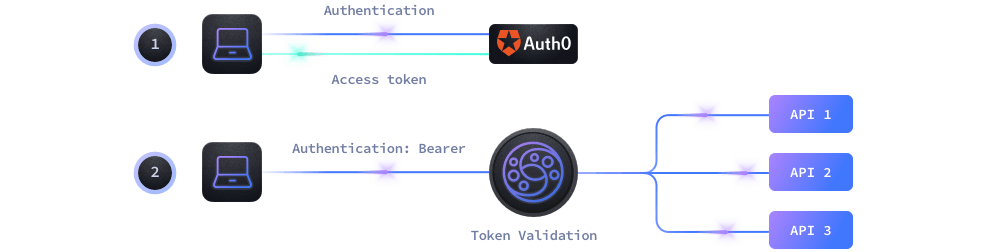
The validation workflow
Either if you are trying to protect your API from end-users or machine-to-machine access, the workflow is the same:
- End-Users use their applications to log in to Auth0 who provides an access token for the session.
- Machine-to-machine communication also uses a token from Auth0 after providing a client_id and a client_secret.
- With the token generated by Auth0, the client passes it to KrakenD in each request inside an HTTP header or cookie
- KrakenD authorizes or not the usage of the specific endpoint according to the rules you have configured.
As KrakenD can validate the Auth0 signature by itself, it does not need to call an Auth0 server to validate the token every time. Instead, KrakenD queries Auth0 every 15 minutes (configurable) to ensure the signature has not rotated.
Enabling JWT validation in KrakenD
We will create a simple KrakenD configuration with a single endpoint /auth0-protected. This endpoint enables JWT validation and makes sure that no user or machine can access the resource without passing a valid token.
Paste the following configuration into a krakend.json file.
{
"version": 3,
"timeout": "3s",
"endpoints":[
{
"endpoint": "/auth0-protected",
"extra_config": {
"auth/validator": {
"alg": "SIGNING_ALGORITHM",
"audience": ["AUDIENCE"],
"jwk_url": "https://DOMAIN/.well-known/jwks.json"
}
},
"backend": [
{
"host":["http://localhost:8080"],
"url_pattern": "/__health"
}
]
}]
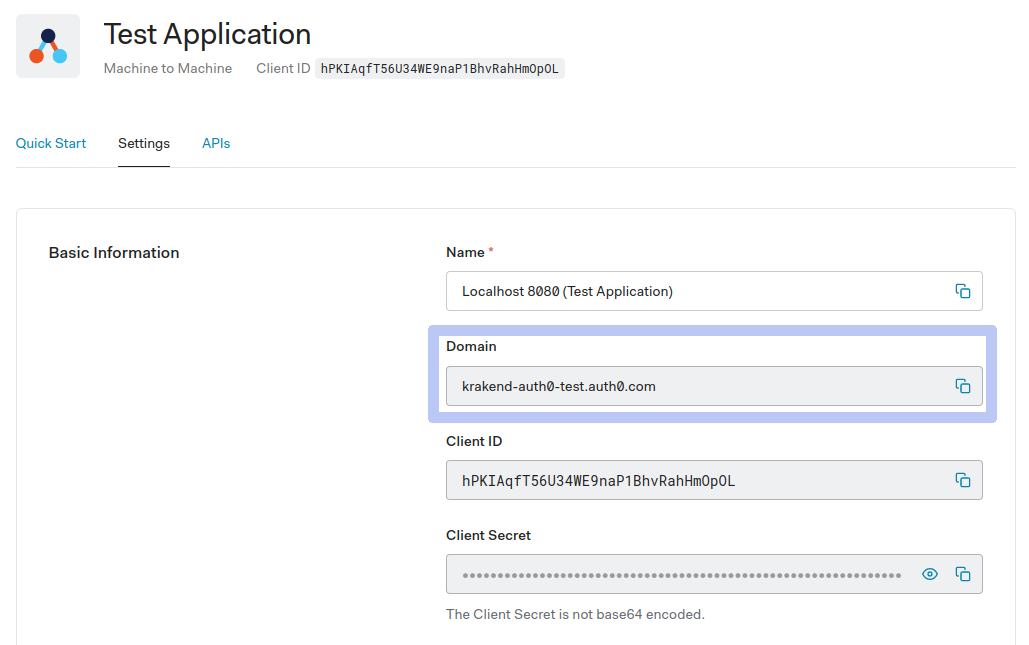
}From the configuration above, we will replace the UPPERCASED values with the settings shown in Auth0. Log in to your Auth0 Dashboard now to retrieve these values. Using the sidebar menu, you can find them as follows:
DOMAIN: Go to Applications -> (Select your application) -> Domain
SIGNING_ALGORITHM: Go to APIs -> (Select your API) -> Signing Algorithm (e.g.:RSA256)AUDIENCE: Go to APIs -> (Select your API) -> Identifier (e.g.:http://api.example.com)
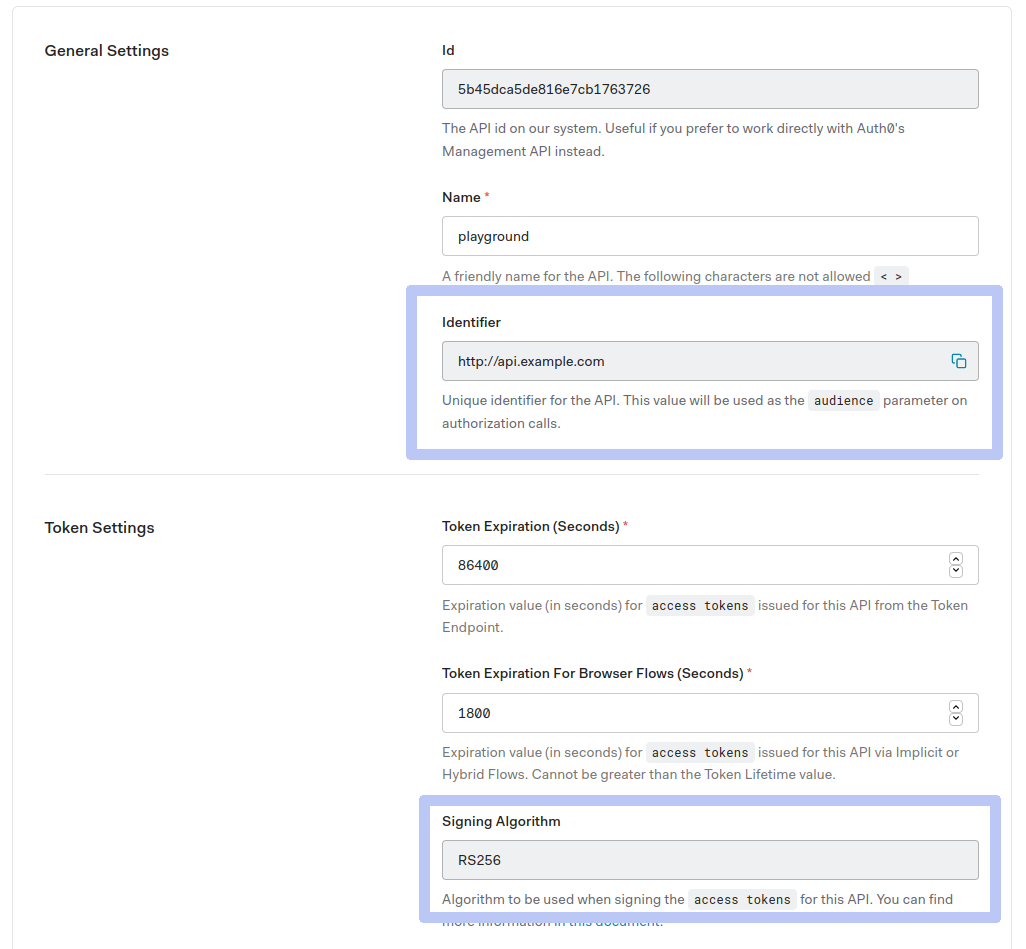
The previous screenshots correspond to a configuration like the one it follows (showing only the replaced content):
{
  "alg": "RS256",
  "audience": ["http://api.example.com"],
  "jwk_url": "https://krakend-auth0-test.auth0.com/.well-known/jwks.json"
}
That’s all you need for the basic configuration! You can expand the structure now to include checking specific roles, claims, etc.
Testing the configuration
The gateway will use itself as a backend. Make sure to replace the backend configuration with your API configuration.
Let’s open a terminal now and from the folder where we create our krakend.json file we run:
Start the gateway with your configuration
$docker run --rm -v "$PWD:/etc/krakend" -p "8080:8080" krakend/krakend-ee:2.13.3The API Gateway is listening in port 8080 now, let’s check the /__health endpoint, which is unprotected:
Check the Gateway is alive
$curl -iG http://localhost:8080/__health
HTTP/1.1 200 OK
Content-Type: application/json; charset=utf-8
Date: Sun, 23 May 2021 15:32:32 GMT
Content-Length: 15

{"status":"ok"}
Good, we were able to connect. Now let’s try to access the /auth0-protected endpoint without a token:
Unauthenticated request
$curl -iG http://localhost:8080/auth0-protected
HTTP/1.1 401 Unauthorized
Date: Sun, 23 May 2021 15:35:52 GMT
Content-Length: 0
Here it is, that was expected. The gateway won’t let us in without a valid JWT token. If you check the KrakenD logs, you will also find a line Error #01: Token not found.
Let’s get a valid token now. If you have a SPA or similar application with Auth0, login and get an access_token. If you don’t have your application implemented yet, the easiest way to test this in the console is to create a new Application of the type Machine to Machine (but any other application will do). The Machine to Machine application provides a Quick Start with a cURL example like the following:
Machine to Machine token request
$curl --request POST \
  --url https://krakend-auth0-test.auth0.com/oauth/token \
  --header 'content-type: application/json' \
  --data '{"client_id":"i1dXlGrQ9MBlWbmXw82jGLetLzw9O2cO","client_secret":"dvbpjLsBiiuz8m-4lMgHWInegE9sq2nUcJlgXqgYnyAoGFng66MQRicN9oPKaTIQ","audience":"http://api.example.com","grant_type":"client_credentials"}'
The response of the call above will provide you with an access_token. It looks like this:
Access token example
${"access_token":"eyJhbGciOiJSUzI1NiIsInR5cCI6IkpXVCIsImtpZCI6Ik1ETkdNalUyTTBVM1JFUkZRVUV3T1VVelFVTXdRME5CTjBZMVJVWTBPRUl4TlRSRE0wSXhNdyJ9.eyJpc3MiOiJodHRwczovL2FsYmVydC10ZXN0LmF1dGgwLmNvbS8iLCJzdWIiOiJpMWRYbEdyUTlNQmxXYm1YdzgyakdMZXRMenc5TzJjT0BjbGllbnRzIiwiYXVkIjoiaHR0cDovL2FwaS5leGFtcGxlLmNvbSIsImlhdCI6MTYyMTc4NDQzMSwiZXhwIjoxNjIxODcwODMxLCJhenAiOiJpMWRYbEdyUTlNQmxXYm1YdzgyakdMZXRMenc5TzJjTyIsInNjb3BlIjoicmVhZDpwcm9maWxlIiwiZ3R5IjoiY2xpZW50LWNyZWRlbnRpYWxzIn0.HM1H2GqRYhWlwqgxjzJqX35vKUkx0vjOo3KQyaD7Xv-6rUPMlOwFNQjTfX7jACNah3adxG4pmVMl-WNLOFXHOXp-L8V4CMZNQSFR424ggc7y-866IDix2kIIIFbA2WFwvgkW0HRYJy7H47Zrv1qa9-tlOecMkz5oGknHrENJiimesJ7OqYKU_3HVuLgk4OSfReEb3wAqh9FBadWpfuq_dpl_wZ1sCGGWVwO9kWFHyOoHwXq667hupwgET6AbKDKcwnziK4YPbedGajNit4DTsf7Giy-ULv-_MUktlvfVcPJvrV4tA8mt4CUc2Ef_mQHEvM_FY-yA-0qE3XSHqJqeFg","scope":"read:profile","expires_in":86400,"token_type":"Bearer"}There are several fields in the JSON response, notice that access_token is what you have to pass to the gateway using a Authorization: Bearer ACCESS_TOKEN. Now you are ready to request protected resources from the gateway. In the Quick Start of the Machine to Machine application, you get this second call. Replace the sample URL with your gateway URL:
Getting access to the protected endpoint
$curl --request GET \
  --url http://localhost:8080/auth0-protected \
  --header 'authorization: Bearer eyJhbGciOiJSUzI1NiIsInR5cCI6IkpXVCIsImtpZCI6Ik1ETkdNalUyTTBVM1JFUkZRVUV3T1VVelFVTXdRME5CTjBZMVJVWTBPRUl4TlRSRE0wSXhNdyJ9.eyJpc3MiOiJodHRwczovL2FsYmVydC10ZXN0LmF1dGgwLmNvbS8iLCJzdWIiOiJpMWRYbEdyUTlNQmxXYm1YdzgyakdMZXRMenc5TzJjT0BjbGllbnRzIiwiYXVkIjoiaHR0cDovL2FwaS5leGFtcGxlLmNvbSIsImlhdCI6MTYyMTc4MzU4NywiZXhwIjoxNjIxODY5OTg3LCJhenAiOiJpMWRYbEdyUTlNQmxXYm1YdzgyakdMZXRMenc5TzJjTyIsInNjb3BlIjoicmVhZDpwcm9maWxlIiwiZ3R5IjoiY2xpZW50LWNyZWRlbnRpYWxzIn0.r9GfLsbNqY3UX_1uLza7_lQv7WY--7tWLhWzn-p0bmXOV83leFOkwU5IH0HcxL3KcQaPcG6RFZ5rR1edoF5EJ9r7AXLldFLfzaSi7uYvktgNNTekDRNqg6cePlLCZUYki8Ccx2v2UQKHac4jTQPpx62qJVsg-FDst0au75OlMbXZXvzCRbjMIyXsH52lrv0zuxo22MX8wXZyljquUXUmJOiYHzvXd_I_2vB77IENzcVYWr3zwh7REqGpWSZDpjsIydV6WsV8g91YmwQIFwJQ7eSTOXpVjFko04JKPOcVzkVQpCPhWL_Uwq0QgOq3HoOujh8GCp4oKON2Xt9VS4Y2ag'
{"status":"ok"}
That’s it! The {"status": "ok"} is the response you have from the /__health endpoint after being validated as a legitimate user.
More complex workflows
We have completed a basic setup that validates users using access tokens. With this simple configuration, we introduce a highly secure ecosystem that protects your business from undesired access. Now you might want to add additional checks to your system and take advantage of all the powerful features of Auth0.
Some possibilities are:
- Create Roles or Auth Pipeline Rules in the Auth0 panel and add them as a condition to accessing an endpoint in KrakenD.
- Define scopes and validate them on KrakenD
- Propagate claims to your backends.
All of this is possible by declaring more elements into the configuration.
Conclusion
In this walk-through, we have shown how to securely protect your APIs using KrakenD and Auth0 in a few minutes.
Combining both systems provides excellent benefits. For one side, Auth0 lets you forget about the arduous task of managing, auditing, securing, or updating standards that an authentication system requires. For the other, KrakenD handles the complex part of authorizing users, which requires a high level of security, such as dealing with fingerprints and cipher suites while using an approach that allows you to scale linearly ingesting any amount of traffic.
Auth0 and KrakenD collaborate efficiently and without coupling during the run-time to reliably identify your users and let them see what they are supposed to.
We are hoping that this reading has been helpful, and if you have any questions get in touch with us!
